
Help System
|
|
Help System |
 |
On the right
hand side of the editor is the Document Element List. It has three
principle regions:
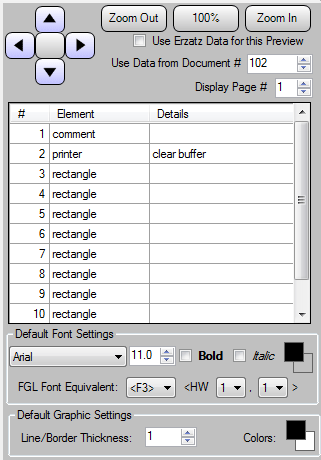
You can move the viewport around using the arrow buttons in the View Controls area. The center button returns the viewport to the HOME position. Use the ZOOM IN and ZOOM OUT buttons to scale the viewport larger or smaller. The 100% button returns the zoom to the default setting. The checkbox for "Erzatz Data" toggles the Design view between using FIELD NAMES or PADDED CHARACTERS. "Erzatz" is a German word that means "fake", and since I was forced to take 6 courses in German at college, I am using the word here to get my money's worth! When previewing a document with actual database values, you can set the document ID and specific page number using the bumper buttons at the top. The document ID refers to the specific identifier for the type of document being edited. For example, if you are editing a ticket, then the 102 shown in the illustration means to fetch Issued Ticket #102 from the database and display the values for that ticket. |
The list of elements allows you to see the order in which the document will be processed, and provides a way to select the elements when you have graphics on top of text on top of other graphics on top of images. This can be a pain sorting out when selecting with a mouse, so you can simply right click on the desired element in the list to edit or delete it.
At the bottom are settings that the editor will use as defaults when inserting new document elements.
See Also: