
Help System
|
|
Help System |

Your FGL Printer can produce a variety of barcodes to print on your ticket. Barcoding commands are actually put together with several options, depending upon what barcode type you wish to print. Here is the general form of a barcode command, and we’ll explain what each option does as we go…
<AB#>something to print
Now, you will NOT use the letters “AB” ever, they are just placeholders representing command options here.
Instead, you will replace the “A” above with:
U if you want to print
UPC and EAN8 codes
E if you want to print EAN-13
N if you want to print code 39 (3 of 9, this is the most popular)
F if you want to print 2 of 5
C if you want to print uss-codabar
O if you want to print code 128
You will replace the “B” above with:
P if you want the
barcode printed horizontally (Picket Fence)
L if you want the barcode printed vertically (Ladder)
You will replace the # with a number that indicates how “wide” the barcode is to be, in units of 8 dots each. For example, if you use “4”, then the barcode will be 32 dots tall. (4 x 8 = 32)
You will replace the “something to print” with whatever it is you want written in barcode.
For example, if you wanted to print the number “*89887*” in code 39 barcode, vertically, 64 dots wide, the command would be <NL8>*89887* (the asterisks are the start and stop symbols for code 39)
Most times, you will want the printer to also produce a human readable text version of the data being printed in barcode, just in case an operator ever has to do something with the data manually. The command to do this is <BI> and it is ONLY IN EFFECT for the barcode command that IMMEDIATELY FOLLOWS IT. So, adding that to the example above would be: <BI><NL8>*89887*
On printers with very fine printhead resolution (200 dpi or greater) you may need to make the individual lines of the barcode “thicker” so that they are easier and more reliable to scan. The command to “thicken up” the barcode lines is: <X#> where # is a multiplier of how many times thicker you want the barcode to be. For example, <X2> would make the minimum barcode line two dots thick. The command <X5> would make it 5 dots thick. Adding that to our example we get… <BI><X2><NL8>*89887*
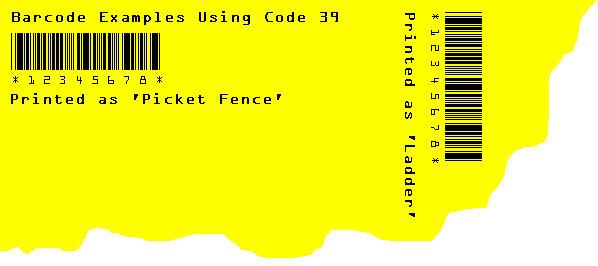
Here is some sample code to illustrate bar code printing with an FGL Printer:
<F3><HW1,1><RC50,50>Barcode Examples Using Code 39
<RC100,50><X2><BI><NP6>*12345678*
<RC180,50><F3>Printed as 'Picket Fence'
<RC50,950><X2><BI><NL6>*12345678*
<RC50,850><F3><RR>Printed as 'Ladder'
The output from the above code should look very similar to this:
See Also: