Help System
 |
Help System |
Right Click on any non-element area of your document to bring up the Page Layout and Form Properties dialog. Shown below are two examples:
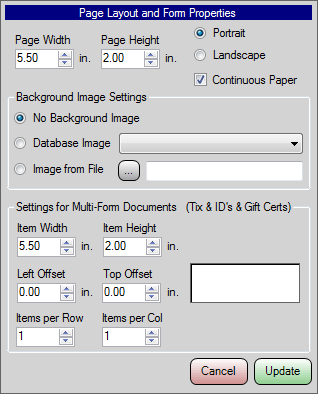
If you are using a Thermal Ticket Printer, such as a Boca or Practical Automation, a very common ticket size is 5.5 x 2 inches. Here are the settings for such a typical ticket/printer combo:

This example is a SINGLE ticket form (one ticket per one piece of paper), and the form is to be considered "continuous" since the thermal printer is actually going to decide where to cut things using the printer registration marks on the back of the ticket stock. Notice that the PAGE dimensions are the SAME as the FORM dimensions (again, one ticket per one piece of paper, they are the same thing)
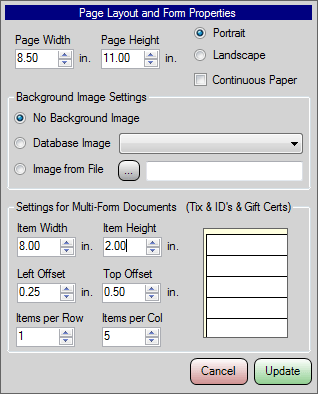
In this next example, assume that you are using a Laser Printer, such as an HP Laserjet to print tickets. It is most likely then that you will have special stock sized as 8.5 x 11 inches. Let's assume you have such stock, perforated to tear out into 5 tickets, each 8 inches by 2 inches. Here are the settings for such a typical ticket/printer combo:

If the tickets are 8 inches wide, then that means there must be a quarter inch perf border on the left and right edge of the paper. Similarly, if 5 two inch tall tickets are on the sheet, that means there must be a half inch perf border on the top and bottom. This is an example of a MULTI-FORM document. There are 5 tickets per each sheet of paper. Notice that the PAGE dimensions ARE NOT the same as the FORM dimensions (again the sheet is a letter size, the individual tickets on the sheet are 8 x 2)
The form is set to PORTRAIT, and the CONTINUOUS PAPER option is turned off, since these are individual sheets fed through the printer.
The Item Sizes, Offsets and Item Counts are set, and a small thumbnail preview helps confirm that we have the form set up correctly.
See Also:
WYSIWYG Main Help
Selected
Element Operations
Adjusting the
Section Height