Help System
 |
Help System |
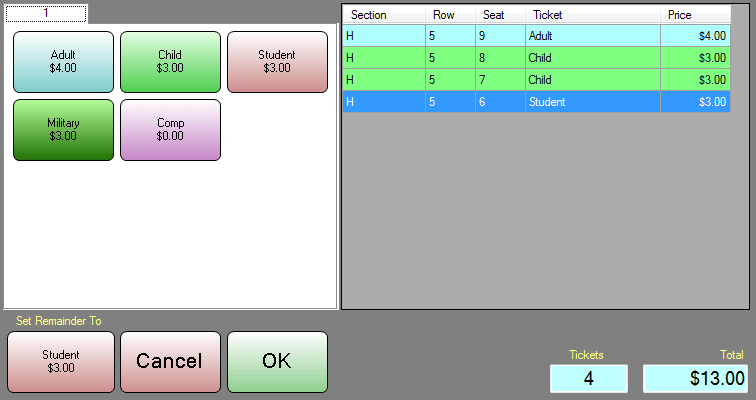
When you have selected seats in the Venue Browser during POS Operations, you will be presented with the following dialog to assign specific ticket types and prices to the seats selected,

In this example above, there are 5 tickets types to choose from, and the operator has selected 4 seats. Each time you click on a ticket type button, the next unassigned seat is set to that ticket type. In the example above, for the four seats selected, we have 1 ADULT, 2 CHILD and 1 STUDENT ticket assigned to them. When assigning just a few tickets, it is OK to click on the buttons a few times to get the job done. When you are selling large groups, you are not going to want to click the ADULT button 322 times. For this reason we have an additional button at the bottom of this window, next to the CANCEL button. This button will set the REMAINDER of any UN-ASSIGNED seats to the LAST ticket type you clicked on manually. This can really save you a lot of button clicks!
Example:
Let's say we had a group of 45 Boy Scouts attending your event. These Boy Scouts are coming with 3 Adult Chaperones, and 42 Scouts. You could click the ADULT button 3 times, the CHILD button 1 time, then click the SET REMAINDER TO button 1 time. This is a total of 5 clicks to set 45 seats to their proper ticket types. Much quicker than doing each one individually.
If you make a mistake, you can simply click on the seat in the list, then click on the correct ticket type.
When you are done, click OK.
If you wish to clear the seats and select different ones, click CANCEL.
See Also:
Venue Browser
Seat Selection Options
Assigning Hold Types to Seats