Help System
|
|
Help System |
The Venue Browser is the principle way you navigate through the available seats for any scheduled attraction. Here is an illustration of the Venue Browser (shrunk in size to fit in the help screens better) with some of the major components labeled:
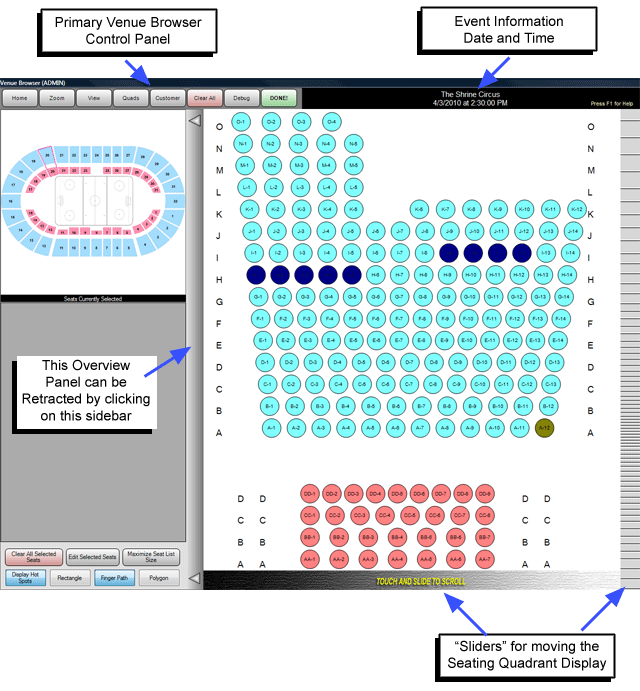
Along the top you will see a series of buttons which make up the primary controls on the Venue Browser. Just to the right of the control buttons, and situated above the seating diagram, you will see information regarding the Attraction Displayed. Other messages might appear here during various operations. On the LEFT side of the screen is the VENUE OVERVIEW panel. It can be retracted to let you see more of your seating selection area, or it can be drawn out (as shown) for fast navigation in larger venues. At the BOTTOM and RIGHT sides of the seating diagram, you will see SLIDER BARS, which will let you move the seating display about as needed. You can also move the seating chart around by touching down on an EMPTY area, away from any seats, and then "drag" the whole display around.
The HOME button will return you to the default position for the seating diagram.
The ZOOM button will let you "scale" the seating diagram, to make the seats larger or smaller
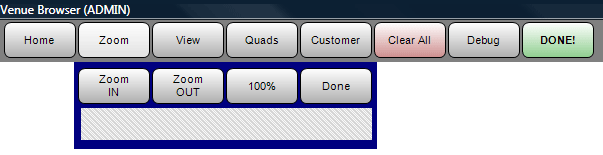
■ You can click on the ZOOM IN or OUT buttons to step through scale factors
■ You can click on the 100% button to return to the "default" scaling factor
■ You can click DONE if you no longer need this menu.
■ You can drag your finger on the strip on a touch screen to manually select a scale factor
The VIEW button will allow you to set the options for the seating diagram appearance:

■ You can choose to see your seats as CIRCLES, SQUARES or SHAPES, by clicking on the first button
■ You can choose to color in your seats by SECTION, TYPE or COST colors, by clicking on the second button
■ You can choose what (if any) labels to display inside seats by clicking on the third button
■ You can launch the 3D Viewer to see your house in 3D rendering, while still being able to pick seats
■ You can click DONE if you no longer need this menu.
The QUADS button will allow you to select which quadrants you want displayed in the seating diagram:
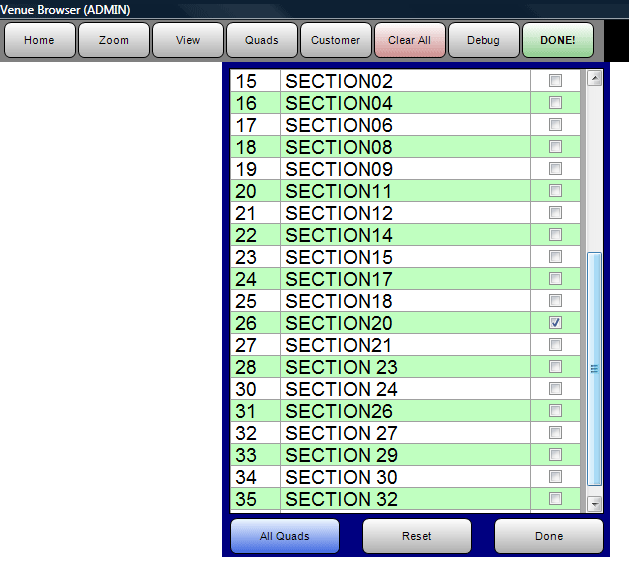
■ In this example, only SECTION 20 is selected.
The CUSTOMER button will allow you to select the customer being acted upon, by invoking a CUSTOMER SEARCH.
The CLEAR ALL button will clear any seats you have selected during this browser session.
The DEBUG button is there for NCS Technician Use.
The DONE exits the Venue Browser
When displayed, the OVERVIEW panel will provide a Main Seating Chart Display, along with a list of selected seats (if applicable) and additional control buttons.
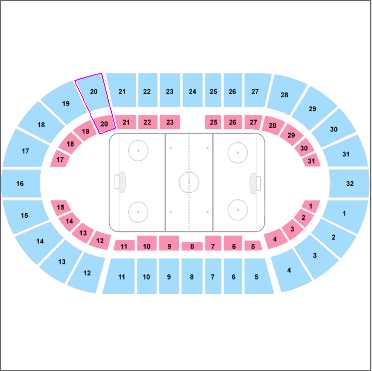
In the example above, the option to show hot spots is selected, and we can see that SECTION 20 is currently being displayed. Clicking on any available area will navigate to that portion of your venue.
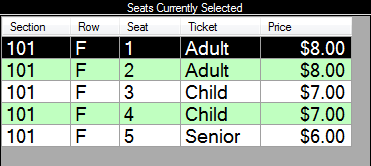
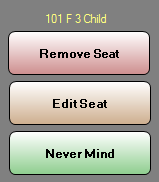
If your current operation supports it, you will see a list of seats that you have selected, along with their selected attributes. Double clicking on a seat in the list will produce this pop up button panel, with three self explanatory selections:
The bottom panel of controls looks like this:
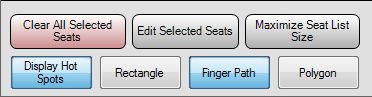
The CLEAR ALL SELECTED SEATS will clear all seats selected during this browser session
The EDIT SELECTED SEATS button will allow you to recall the seats selected during this browser session, to change the selected ticket or hold type.
The MAXIMIZE/MINIMIZE SEAT LIST button hides or shows the graphic overview, giving more or less room for the list of selected seats.
The DISPLAY HOT SPOTS option toggles between showing or hiding the hot spot areas of the displayed quadrants. In the examples above, the option is turned ON.
The remaining three buttons determine the SEAT SELECTION MODE. In the example above, selection by FINGER PATH is selected.
See Also:
Assigning Ticket
Types to Seats
Assigning Hold
Types to Seats
Quick Seat Statistics