Help System
 |
Help System |
There more times than you can count where you want the computer to "fill in" some data value for you on some document. Common examples are things such as EVENT NAME, or DATE or perhaps TICKET PRICE. We call such things "Data Fields". You can add a Data Field to your document, and set the border and font style and colors as well as the line thickness. You can also ROTATE the text printed, set alignment properties and set any "helper hints" for FGL code generation for older thermal printers. Data Fields are contained in "Print Areas" that you draw out.
You can begin drawing a Print Area for your Data Field string in one of three ways:
1. From the EDIT MENU, select INSERT INTO DOCUMENT, then DATA FIELD
2. From the UPPER TOOLBAR, click on the DATA FIELD button
3. From the LOWER STATUS BAR, click on the ADD A DATA FIELD button
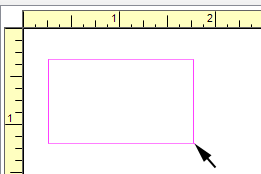
While you are drawing a print area on your document, you will see something like this:

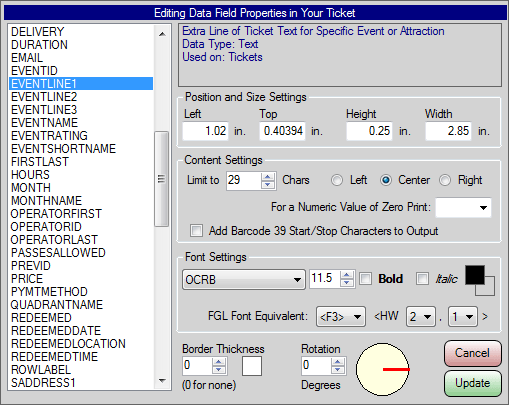
Once you let up on the mouse button, the following properties dialog will appear:

Here you can set the specifics of your Text String.
To Select the Data Field to
Print:
From the list displayed on the left hand side of the dialog, select the data
field you wish to print. Only data fields that are available for the type
of document will be displayed, so any choice is a legal one. Anything not
displayed is not allowed for the type of document you are editing.
To Precisely Position the
Print Area of Your Data Field Text:
The values for the upper left corner and the Height and Width of the print area
are available for manual editing as shown. You can enter PRECISE values if
the numbers that arise from mouse dragging are not to you specifications.
To Set the Clipping and Layout
of Your Data Field Text:
You can instruct the computer to "clip" the text at a certain number of
characters using the LIMIT TO bumper buttons. Select the desired alignment
within the print area, either Left, Center or Right.
To Set Font and Color
Attributes for Your Data Field Text:
Use the pull down list to select the desired font for your text. Use the
bumper buttons to set the font size in "points". Check the options for
BOLD or ITALIC as desired. (Note: not all Windows
fonts support the Bold and Italic attributes, and NO FGL font does)
Double click on the color chits next to the italic control, and select the
foreground and background colors for your text. (Note: not all
Windows printers support text coloring, and NO FGL printer does)
FGL "Helper Hints":
To make automatic code generation for FGL printers possible, you need to
supply the EQUIVALENT FONT to use on your thermal ticket printer. This is
never likely to be an EXACT match, since FGL printers only have 13 internal
fonts, and Windows can support a gadzillion True Type fonts.
("gadzillion" is a real number, and is the projected US Debt in 2015).
Although the firmware in these printers varies, making the fonts produced by the
printers different, here are a couple of settings we find work out OK with the
printers in our offices:
| On Windows Printers | FGL Equivalent Font |
| ARIAL 8 Point, Not Bold, Not Italic | <F2> <HW1,2> |
| ARIAL 11 Point, Not Bold, Not Italic | <F3> <HW1,1> |
| OCRB 11.5 Point, Not Bold, Not Italic | <F3> <HW2,1> |
You can experiment with your printer and installed Windows Fonts for other reasonable combinations.
To Put a Border Around Your
Data Field Text:
Click on the Border Thickness Bumper Buttons, and set the desired thickness in
"pixels". A value of zero results in no border at all. Double click
on the color chit next to the border thickness control, and select a color for
your border line.
To Rotate Your Data Field
Text:
Click on the Rotation Bumper Buttons, and set the desired angle in degrees.
A value of zero results in no rotation at all.
For FGL Printers, only the values of 0, 90, 180 and 270 are respected.
To EDIT the properties of an existing Data Field in your document, simply RIGHT CLICK on it to bring up the properties dialog shown above.
See Also:
WYSIWYG Toolbar
Adding a Circle
Adding a Rectangle
Adding a Line
Adding a Data Field
Adding a Text Constant
Adding an Image
Adding an ASCII Character
Adding a Printer
Command