
Help System
|
|
Help System |
You can add images to your documents. Images are contained in "Print Areas" that you draw out.
You can begin drawing a Print Area for your image in one of three ways:
1. From the EDIT MENU, select INSERT INTO DOCUMENT, then IMAGE
2. From the UPPER TOOLBAR, click on the IMAGE button
3. From the LOWER STATUS BAR, click on the DRAW AN IMAGE AREA button
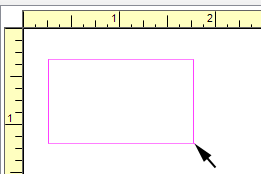
While you are drawing a print area on your document, you will see something like this:
Once you let up on the mouse button, a dialog will appear, allowing you to select one of THREE ways in which you want to add an image to your document:
OPTION 1: Adding an image from your database list of general images for printing:
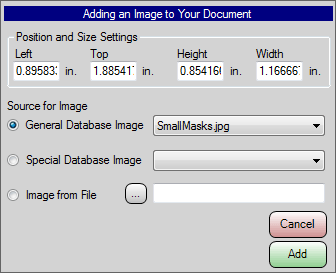
Select the GENERAL DATABASE IMAGE option, then select the specific image from the drop down list. Images from the General Database are available to ALL Stations on your network, and is the preferred way to add a static image to your document.
OPTION 2: Adding an image from two "special" database images:
Select the SPECIAL DATABASE IMAGE option, then select either the ATTRACTION IMAGE or the CUSTOMER IMAGE from the drop down list.
OPTION 3: Adding an image from a file on your computer (this is the least preferred):
Select the IMAGE FROM FILE option, then browse to select the specific image file. Images from files on your station are NOT available to ALL Stations on your network, and this is why this method is not the preferred way to add a static image to your document.
To Precisely Position the
Print Area of Your Image:
The values for the upper left corner and the Height and Width of the print area
are available for manual editing as shown. You can enter PRECISE values if
the numbers that arise from mouse dragging are not to you specifications.
To Put a Border Around Your
Picture:
You would have to manually draw a RECTANGLE around the picture, creating a
second print element. Make sure that the RECTANGLE is a LOWER ELEMENT
(draw it first), so that the rectangle does not cover up your image.
To EDIT the properties of an existing image in your document, simply RIGHT CLICK on it to bring up the properties dialog shown above.
See Also:
WYSIWYG Toolbar
Adding a Circle
Adding a Rectangle
Adding a Line
Adding a Data Field
Adding a Text Constant
Adding an Image
Adding an ASCII Character
Adding a Printer
Command