Help System
 |
Help System |
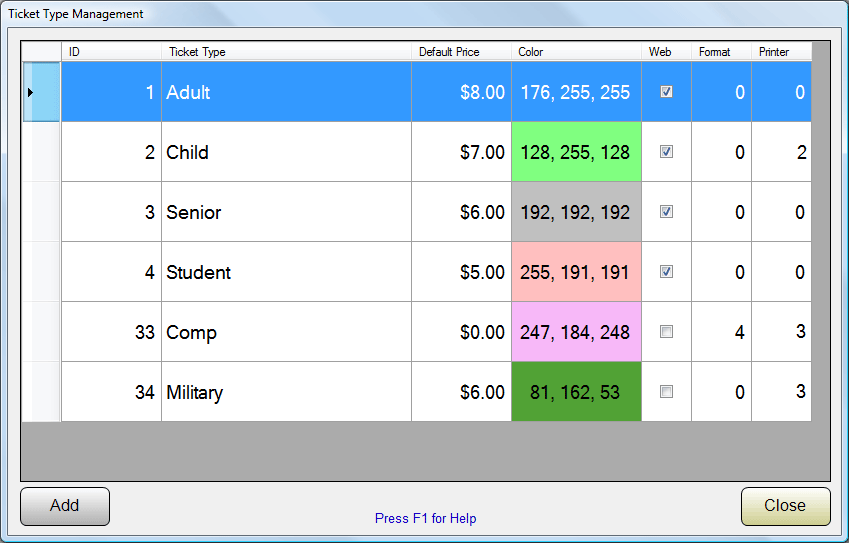
Tick-It! Trak Pro allows you to create a limitless number of ticket types for your use. The forms for creating and managing taxes look like this:

Using the List Window displayed above, you may create a limitless number of ticket types, to suit your specific needs. Double Click on an existing ticket type to edit it, or click on the ADD button to create a new one.

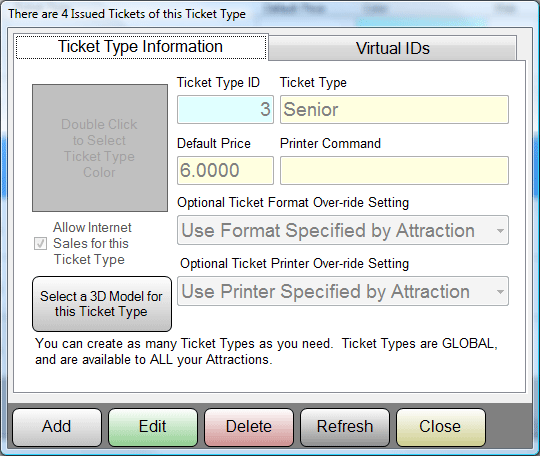
You can assign a Name, a Color, a
Printer Command and a Default Price for each ticket type. As you assign ticket
types to attraction schedules, you can change the price, the default price just
pops in as a suggestion. If you put the most commonly charged price for your
tickets as the default, this will speed data entry later during the schedule
building.
The color you choose for the ticket is the color that will be used to display
reserved seating charts when you request a view by Ticket Type. It would be best
to avoid really dark colors, since that would make the labels in seating chart
display difficult to read. In the example above, we selected a light gray, for
Seniors.
If you want certain ticket types to cause specific printer actions, you can put
a special printer command in for each ticket type. For example, if you were
using a Boca Dual Mini printer, which allows for the printing of tickets on two
separate stocks, you might want your ADULT tickets to print on a different stock
than all your other ticket types. You could put the command <P2> in the ADULT
ticket printer command, to tell the Boca Dual Mini to select the second paper
path, and put the command <P1> in the other ticket types, as shown in the
example above. Usually the printer command is simply left blank.
You can specify which of the 5 virtual ticket printers you want tickets of that
type to print on. For normal ticket printing to the printer specified in the
Attraction Record, Select Use Printer Specified by Attraction. This is
represented by the number 0 in the database. To direct
tickets of a particular type to be routed to a specific printer, select that
printer number, 1 through 5. Values outside this range are treated as zero. In
the first example illustration above, all tickets will print normally, except for CHILD, which will
always be directed to Printer 2, and the COMP and MILITARY tickets, which will
be directed to Printer 3.
You can specify which ticket format you want tickets of that type to use. For normal ticket printing using the format specified in the Attraction Record, Select Use Format Specified by Attraction. This is represented by the number 0 in the database. To use a different format, select that format in the pull down list. In the first example illustration above, all tickets will print normally, except for COMP, which will always use format number 4.

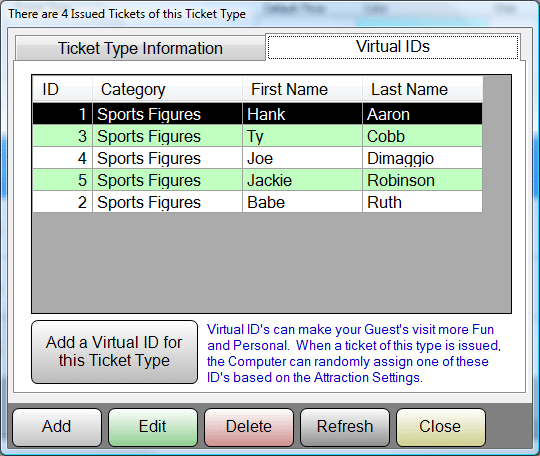
For additional fun for your guests, you can program the system to "assign" Virtual Identities to each ticket issued. Virtual ID's can have names and biographical info which can print on tickets, to make things more interesting for your visitors. The specific Virtual ID's that are allowed are set per ticket type. So, in this example, for the SENIOR ticket type, we are going to allow the computer to randomly assign famous baseball players from the past, which our older guests are more likely to recognize. For other ticket types, such as YOUTH, we might assign a list of more RECENT ball players, for younger guests.

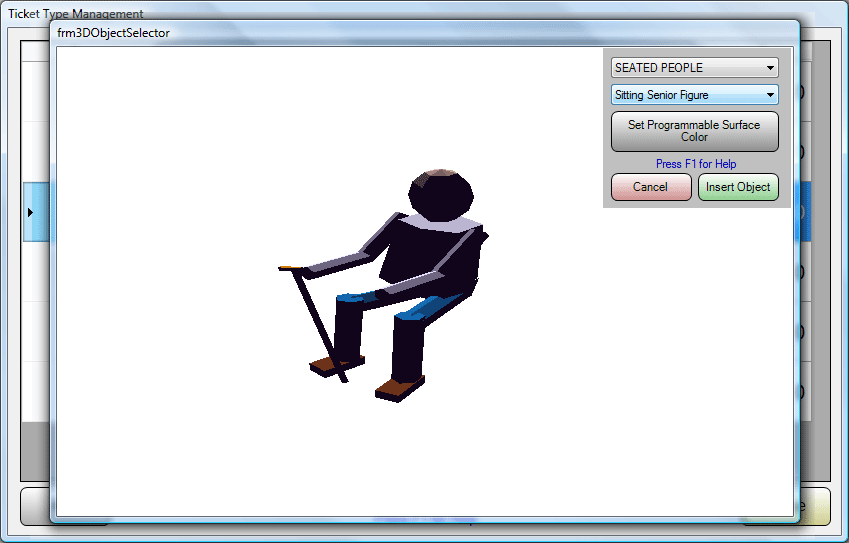
For 3-D displays, you can select the
model used to represent people that have purchased this ticket type. When
you click on the button to select a 3-D Model, a window will appear that will
display models in a spinning fashion, so you can see what they look like all
around. Select SEATED PEOPLE from the pull down in the upper right hand
corner, then select the figure you want. In this example, we selected a
paunchy figure with a cane for SENIOR tickets.
See Also:
Attraction Categories
Typical Cineplex (Movie) Attraction
Typical Performing Arts Attraction
Typical Theme Park Attraction
Typical Sporting Attraction
Database Record Controls
Changing Tickets and Prices
3-D Models