Help System
 |
Help System |
You start by clicking the Insert Seats button along the left hand side of the screen. A seat insertion wizard will appear, and allow you to easily put seats in your venue in one of three different ways:
nStraight Rows (several rows at a time)
nTables (one table with many seats at a time)
nCurved Rows (many variable rows with seats in curved lines)
Choose the type of seats best suited to your venue.
Inserting Straight Rows

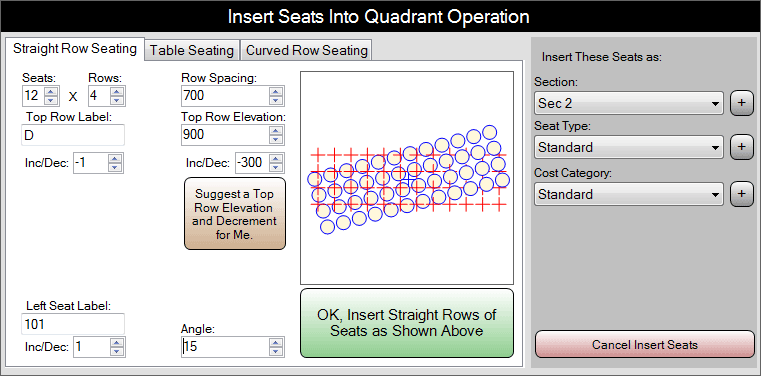
You can enter the size of the block of seats, in the example above we are putting in 4 rows of 12 seats. When the seats are being inserted, the program works from the top down, so you can specify the ROW label for the TOP row of the block of seats you are placing. This is typically a letter or letters, but not always. In this example, we want the rows to be labeled A - B - C and D, so we specify that the TOP row is D, and we wish to DECREMENT (count backwards) by 1. Again, as seats are being inserted, the program works from LEFT to RIGHT, so you need to specify the SEAT LABEL (typically a number, but not always) of the LEFT MOST seat being inserted. In this example, we wish the seats to be numbered 101 - 102 - 103 - … 112, so we enter 101 for the starting number, and we wish to INCREMENT (count up) by 1. The numeric bumper value ANGLE at the bottom lets you “tilt” the rows to better reflect the actual seating layout of your venue. In this example, we have “tilted” the rows 15 degrees counter clockwise, to illustrate this feature. On the right side of the window, you can select the SECTION, SEAT TYPE and COST CATEGORY for the seats being inserted. You can create NEW Sections, Types and Categories by clicking on the buttons with the + symbol. You can change individual seats later, if need be. Click OK, Insert Straight Rows of Seats as Shown Above when you are satisfied, or click Cancel if you change your mind.
Inserting Tables

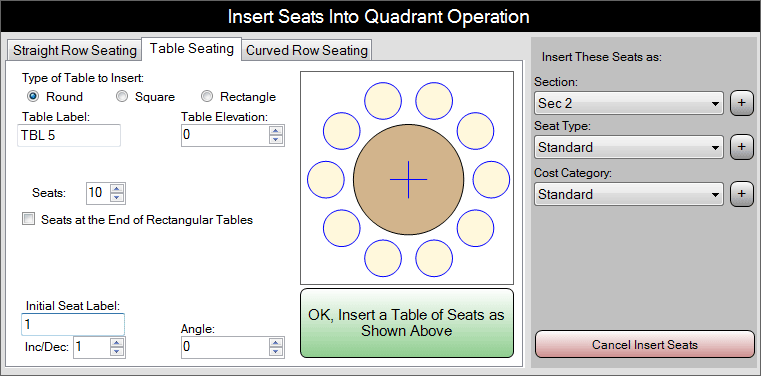
You can select the type of table you wish to insert. There are 4 choices: Round, Square, Rectangular Vertical and Rectangular Horizontal. You can enter the number of seats around the table, in the example above we are putting in 10 seats at a round table.. You then specify the TABLE LABEL. This is typically a letter or letters and a number, but not always. In this example, we want the table to be labeled TBL 5. Again, as seats are being inserted, the program works CLOCKWISE about the table, so you need to specify the SEAT LABEL (typically a number, but not always) of the seat at the 3:00 position. In this example, we wish the seats to be numbered 1 - 2 - 3 - … 10, so we enter 1 for the starting number, and we wish to INCREMENT (count up) by 1. On the right side of the window, you can select the SECTION, SEAT TYPE and COST CATEGORY for the seats being inserted. You can create NEW Sections, Types and Categories by clicking on the buttons with the + symbol. You can change individual seats later, if need be. Click OK, Insert a Table of Seats as Shown Above when you are satisfied, or click Cancel if you change your mind.
Inserting Curved Rows

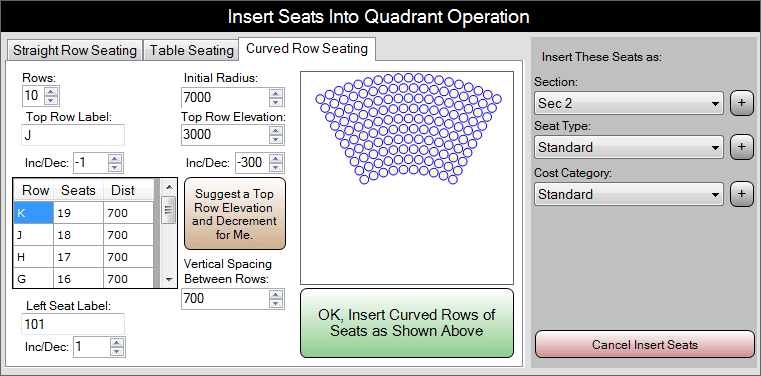
Curved rows are inserted many at a time. You can enter the number of seats in each row, as well as the Row Label. In the example above we are putting in 10 row of 10 to 19 seats. These are typically letters, but not always. In this example, we want the bottom row to be labeled A and go up from there, except for the letter I, we don't want to use that (this is typical in a lot of venues). In the example above, the row after H is labeled J, which we entered by hand. Again, as seats are being inserted, the program works from LEFT to RIGHT, so you need to specify the SEAT LABEL (typically a number, but not always) of the LEFT MOST seat being inserted. In this example, we wish the seats to be numbered 101 - 102 - 103 - … 112, so we enter 101 for the starting number, and we wish to INCREMENT (count up) by 1. On the right side of the window, you can select the SECTION, SEAT TYPE and COST CATEGORY for the seats being inserted. You can create NEW Sections, Types and Categories by clicking on the buttons with the + symbol. You can change individual seats later, if need be. Click OK, Insert Curved Rows of Seats as Shown Above when you are satisfied, or click Cancel if you change your mind.
See Also:
Seat Operations
Seat Selection
Rotating Seats
Sections
Seat Types
Cost Categories
Inserting Shapes
Inserting Labels
Inserting 3D Objects
Display Quadrants