
Help System
|
|
Help System |
The Attraction Record Entry form can appear a little scary, since there are a lot of options and settings you must pay attention to when creating or editing an attraction. Here is the primary Attraction Record Entry screen:

It would be best to step through each field, and define its purpose and usage:
Click for an explanation of the Database Record Control Buttons
Graphic Image:
This is a BMP or JPEG or GIF or PNG file that is used for button images on the Internet Web Site, POS and Kiosk Modules, as well as for printing on tickets, if your printer permits. To select the picture, simply RIGHT-CLICK on the Image while in EDIT Mode. Click for an explanation of Graphic Image Options. It may be left blank.
Attraction ID:
This is the ID Number assigned by Tick-It! Trak Pro. You cannot change or otherwise affect this field. It is displayed for your reference only. This is what will print on tickets when the field EventID is used.
Name or Title:
This is the full name or title of the attraction. This is what will print on tickets when the field EventName is used. It cannot be left blank.
Attraction Type:
Here is where you select the category for the attraction. These are what will print on tickets when the fields Category or CategoryID are used. They cannot be left blank.
Rating / Other:
Typically this field is used for Movie Ratings, such as G, PG, R and so forth. This is what will print on tickets when the field EventRating is used. It may be left blank.
Duration:
This is the duration of the Attraction in Minutes. If the attraction is an all day affair, or if it is otherwise without a time limit, just enter zero. This is what will print on tickets when the field Duration is used. It cannot be left blank.
Affiliate:
Often this field is used to record the distributor of a movie, for later reporting. This is what will print on tickets when the field Affiliate is used. It may be left blank.
Sponsor:
Often this field is used to record the sponsor of a sporting or performing arts event, for later reporting. This is what will print on tickets when the field Sponsor is used. It may be left blank.
Synopsis:
Here is where you would enter a synopsis or other detailed description of the attraction. This is what will print on tickets when the field Synopsis is used. It may be left blank.
Seating Mode:
You can select one of three possible seating modes for an attraction:
General Admission Only
Reserved Seating Only
Mixed Mode Reserved and General Admission
It cannot be left blank.
Ticket Format:
This is where you select which ticket format you wish to use for this attraction. It cannot be left blank, even if you are not going to print tickets.
Printer:
This selects which of the 5 logical ticket printers to use when printing tickets for this attraction, or whether to disable printing for this attraction. Since the POS Module can control up to 5 ticket printers, you can have different ticket or wristband stock for different attractions. It cannot be left blank, so if you do not want to print tickets for this attraction, set the logical printer to DO NOT PRINT.
Special Printer Command:
This is what will be sent to your ticket printer when the field PrinterCommand is used. It may be left blank. One notable use is for specialty printers such as the Boca Dual Mini. The Boca Dual Mini ticket printer can be loaded with 2 different ticket stocks, yet is treated as a single printer. The FGL commands to select which paper path is to be used are <P1> and <P2>. You could enter such as command here to designate the paper path to be used for this attraction, for example.
Misc Lines for Ticket Printing (3):
These three fields provide additional lines for printing information on your ticket that is not already covered by the other fields available. These are what will print on tickets when the fields EventLine1, EventLine2 and EventLine3 are used. They may be left blank.
ATTRACTION CONTROL OPTIONS:
Display All Shows in POS Menu:
When the Tick-It! Trak Pro POS Module displays the dates and times for Attraction Ticketing, it will ordinarily be “smart” about it, and not show the operator any times that have already past. This is great for Cineplexes and Movie Houses, or for timed attractions in Museums or Theme Parks. However, there will be instances where you want to over-ride this behavior, and force the POS Module to display all times in an attraction’s schedule. To do so, simply check this option. For example, if you are running a theme park, where your primary attraction is an all day entry into the park, and your park opens at 10:00AM, you will not want the POS Module to stop selling tickets at 10:01AM, because it thinks that the attraction has passed.
Allow Passes:
Currently, this feature only toggles a message on the POS button to indicate to the user that Passes are not allowed for this attraction. Future versions of the software will expand on this option’s functionality. This is what will print on tickets when the field PassesAllowed is used.
Include in Census when Validated:
Some attractions represent a guest physically entering your facilities, while other attractions are only available to guests that are already present. If this attraction means that the population of your facility is increasing when the ticket is redeemed, then you should check this box. For example, if you were running a museum, then attractions that represented entry to the museum would HAVE this option enabled. If your museum also had an IMAX theater, then attractions based in that theater would NOT have this option enabled, since you do not want to count the person twice.
Opens Gate or Unlocks Turnstile:
The Tick-It! Trak Pro Validation Module can be used to send signals to gates and turnstiles. If this attraction should send a signal to open a gate, then check this option. If you are not using computer controlled gate systems, you can ignore this option.
Allow Internet Sales:
The Tick-It! Trak Pro can sell tickets to your events on the Internet in Real Time. If you are licensed for the Web Ticketing Module, checking this option will allow web visitors to purchase tickets on-line. Un-checking this option will remove the attraction from your internet ticketing portal.
Use Best Available Seating:
If your venue has been properly configured to use Best Available Seating, checking this option will allow operators the CHOICE between manual seat selection, and computer assigned seat selection.
Best Available ONLY:
If your venue has been properly configured to use Best Available Seating, checking this option will FORCE operators to accept computer assigned seat selection.
Restricted Attraction:
Some attractions represent special deals that you might not want every operator to have access to. If you check an attraction as “restricted”, then only those operators with the privilege to view restricted attractions will be able to issue tickets.
Allow Exchanges:
Check this option if you wish to allow customers to exchange tickets for this attraction.
Restricted Attraction:
Some attractions represent special deals that you might not want every operator to have access to. If you check an attraction as “restricted”, then only those operators with the privilege to view restricted attractions will be able to issue tickets.
Use Image on POS Button:
Some attractions are easier to distinguish by using a picture on a button. Check this option to put the attraction image on the POS button for the operator to see.
Suppress Caption on POS Button:
Some attractions are easier to distinguish by using a picture on a button without any words. Check this option to SUPPRESS the printing of the button caption on the POS button.
Button Caption:
This is a short name that will fit on the POS Button the operator will click to sell tickets. For example, take the musical "Les Miserables". It is easier to fit the common nick name “Le Miz” on the POS Button. This is what will print on tickets when the field EventShortName is used. It cannot be left blank.
Menu Sort Order:
Attractions are sorted on the POS screen in the following manner: First by this Menu Sort field, then by Attraction Title. The default value for this field is 1. You may use this field as a convenient way to group and control the way your attractions are displayed on the POS Screen. For example, if you are doing sporting events, all BASEBALL attractions could have a sort order of 1, while FOOTBALL had a sort order of 2, and so on and so forth.
Button Button:
Click this button to set the BACKGROUND color of the POS Button for this Attraction.
Text Button:
Click this button to set the TEXT color of the POS Button for this Attraction.
On Sale Date:
This is the first day that tickets can be sold for this attraction. The default value is today, the date you create the record. If you wish to postpone sales to some future time, enter that date here. It cannot be left blank.
When a ticket is issued for this attraction, there will come a time that it should be considered dead, even if it has not been redeemed. There are six options for the expiration date action, and they are:
(1) Next Day
(2) End of Week
(3) End of Month
(4) End of Year
(5) Specified Days
(6) Never
The default, and most common action is Next Day. In other words, a ticket good for entry on Wednesday becomes dead on Thursday. End of Week / Month / Year are exactly as you would expect. The option “Specified Days” works in conjunction with the following field, Days. If you want to issue tickets that are good for 3 days from the initial date, then you would select “Specified Days” with a Days value of three. The last option is “Never”, and that would represent a ticket valid for a lifetime. This field cannot be left blank.
Days:
The option “Specified Days” works in conjunction with this field. The default, and most common value is 1. If you want to issue tickets that are good for 3 days from the initial date, then you would select “Specified Days” with a Days value of three. This field cannot be left blank.
Count:
When a ticket is issued, you might want that ticket to be valid for a number of entries. That is what this field specifies. The default, and most common value used is 1. In other words, most tickets are good for “one shot” only. However, lets say you were selling tickets to an attraction that allowed the user to visit 10 times on a single ticket. You would enter a value of 10 here. If a ticket is to have a limitless number of entries, then enter a value of –1. It cannot be left blank.
You can use combinations of the values of the Expiration Date Action, Days and Count to produce flexible entry schemes. Here are some common examples:
Typical Ticket, good this day only, one entry:
|
Expiration Date Action |
Days |
Count |
|
Next Day |
1 |
1 |
Three Day Pass, Unlimited Visits:
|
Expiration Date Action |
Days |
Count |
|
Specified Days |
3 |
-1 |
Twenty Days or Ten Visits:
|
Expiration Date Action |
Days |
Count |
|
Specified Days |
20 |
10 |
Lifetime Unlimited:
|
Expiration Date Action |
Days |
Count |
|
Never |
1 |
-1 |
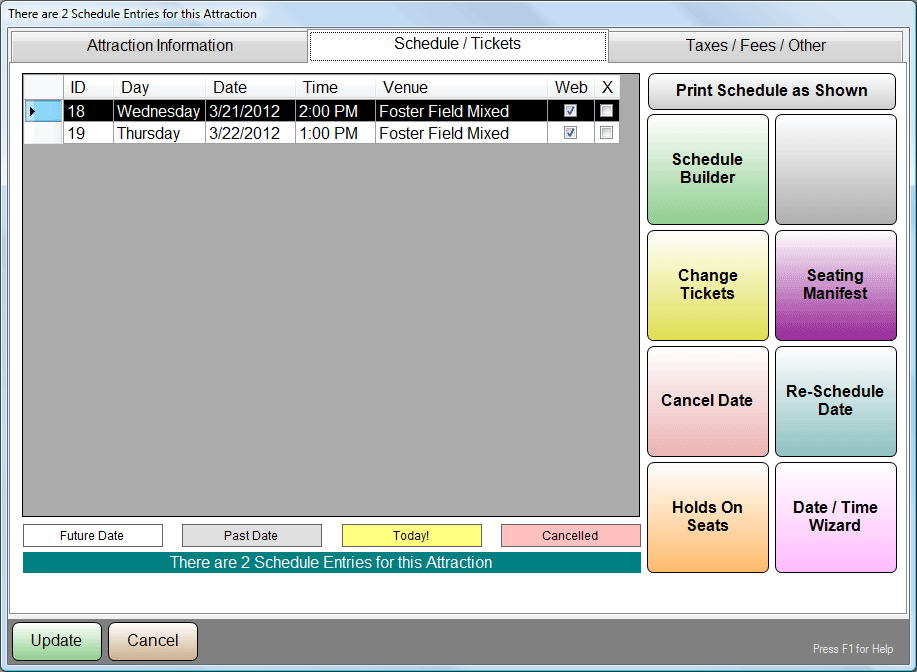
The secondary panel of the Attraction Record Entry form lets you see and modify the schedule for the attraction.
To print the schedule as you see it, click on the Print Schedule as Shown Button.
To generate schedule records, click on the Schedule Builder Button.
To modify available tickets and their prices, click on the Change Tickets Button.
To print a seating manifest for the selected date, click on the Seating Manifest Button.
To cancel the selected date, click on the Cancel Date Button.
To re-schedule the selected date, click on the Re-Schedule Date Button.
To place or remove holds on seats for the selected date, click on the Holds On Seats Button.
To modify Dates and Times in a Batch, click on the Date / Time Wizard Button.
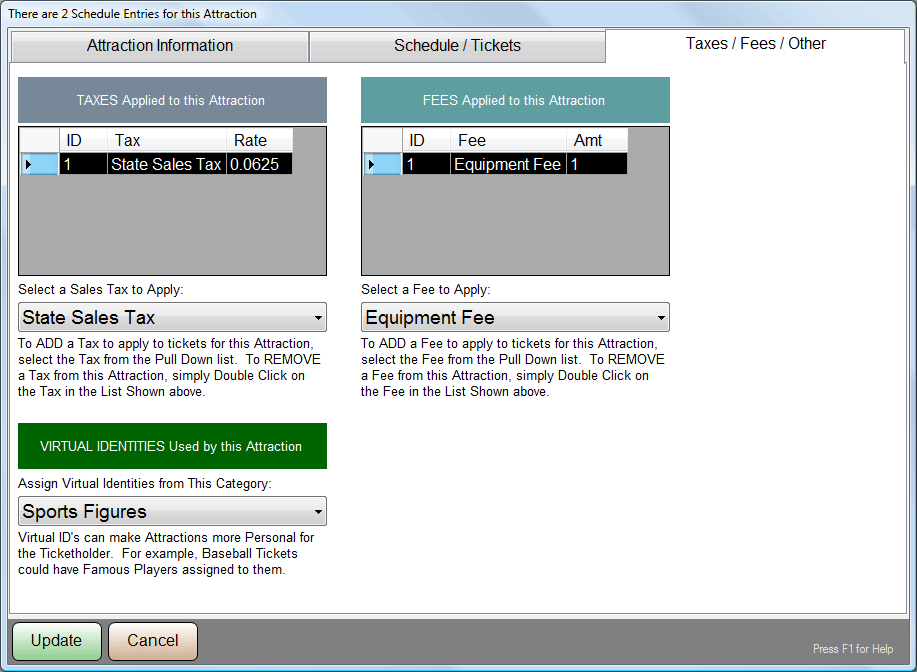
The Third tabbed panel allows you to set any Taxes and Fees that are applied to this attraction. In the example above, a 6 and a quarter percent sales tax, and a one dollar Equipment fee are applied.
Additionally, as tickets are issued, each ticket will be randomly assigned a "Virtual Identity" from a pool of "Sports Figures" identities.
See Also:
Attraction Search
Database Record Controls
Changing Tickets and Prices
Virtual Identities
Attraction Categories
Schedule Record
Schedule Builder
Ticketing Menu
Typical
Cineplex (Movie) Attraction
Typical Performing Arts Attraction
Typical Sporting Attraction
Typical Theme Park Attraction